
Want to know how your AC repair is conducted by the professional team at AC Works? This blog provides all you need to know about our air conditioner repair from the start to the end. We’ll cover repairs for window, split, and commercial air conditioners in detail.
An air conditioner has several attributes that determine its productivity and efficiency, especially while operating for long hours during Arizona’s summer. When you get too busy to pay attention to the semi-annual servicing, the longevity of your AC may be reduced, causing sudden malfunctions and breakdowns. However, if you catch the signs early, there’s a lot we can do to reduce the costs of AC repair.
Repairing air conditioners varies depending upon the brand, build, type, and availability of parts, but the process can be narrowed down to a few key points. Below is a basic run-down of the repair process.
- Disconnecting the power supply
- Cleaning the condenser coils
- Testing the air conditioner fuses
- Inspecting the internal parts of the access panel
- Replace the start capacitor
- Replace the AC contactor
- Test your repairs
- Putting the AC back together and observing improvements
Do not hesitate to call your AC repair service experts team of professionals at AC Works to ensure the job is done right. Messing up repairs through DIY attempts may cost you more money than actually relying on a professional HVAC service company.
How Long Does AC Repair Take?
Based on the work required for your air conditioner. It may take no more than three to four hours. However, if there are major replacements and changes, especially in commercial HVAC systems, it may take an entire day for repairs to be completed.
What Preparations Are Needed Before Conducting AC Repairs?
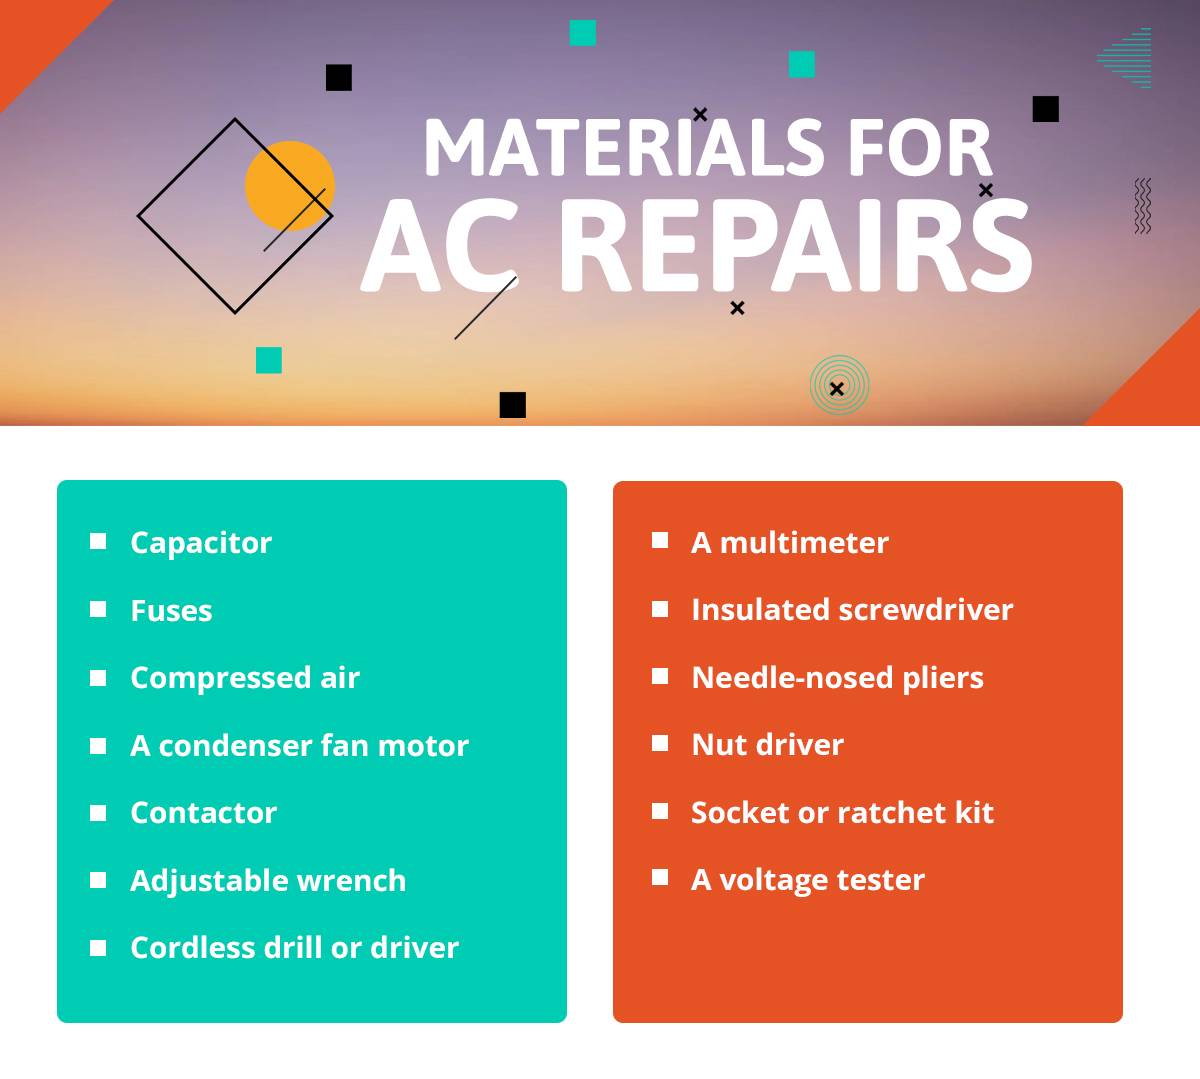
Materials for AC Repairs
There are a few materials and tools that HVAC professionals like AC Works need to perform a complete AC repair:
- Capacitor
- Fuses
- Compressed air
- A condenser fan motor
- Contactor
- Adjustable wrench
- Cordless drill or driver
- A multimeter
- Insulated screwdriver
- Needle-nosed pliers
- Nut driver
- Socket or ratchet kit
- A voltage tester
What Are The Steps in the Process of AC Repair?
The team of professionals at AC Works follows the highest safety standards for regularly AC service. We first turn off the power supply to the AC before starting the repair. Before we do any repair work, we make sure that there is no free-flowing electricity to the air conditioner. We cut the supply to your AC from the central electrical panel before pulling the outdoor disconnect or extricating the access panel of the condensing unit. Next, we double-check that the power supply has really stopped by using a voltage tester on the wires that come into the contactor.
Home Air Conditioner Repair
You can optimize the performance of your home AC through basic maintenance. Your home air conditioner could be of two kinds, which require different procedures in repairs. The window AC unit is very different from the split AC. Explained below you’ll find both of the repairs explained in detail.
Window AC Repair
Repairs for when your AC is not cooling
- It’s important to unplug your window AC. If you want to only clean the AC filter, you could just remove the grille and filter. There won’t be a need to uninstall the AC from the wall or window. Some grilles simply pop off, making it easy to work with.
- We then separate the grille and filter while unscrewing the metal cover. We treat the coil fins delicately.
- We wash the filter or replace it.
- We clean the coil fins using a soft brush or vacuum to get rid of all grime and debris.
- Using a rag, we clean the unit and ensure that all drains that facilitate condensed water to escape are unclogged. We let it dry well.
- We lubricate the motor and any other necessary parts according to the product manual.
- We put the unit back together and reinstall it.

For Condenser Problems:
- We plug in the unit and switch the AC on. We set the thermostat to “cool” and let it reach below room temperature.
- We check whether the outlet works with a voltage tester.
- If a light doesn’t show on the tester, there’s probably an overload. We check the fuse box or electrical panel to replace the fuse or reset the breaker.
- Now if the light works, then the thermostat doesn’t work and the switch needs a repair.
- We use the product manual to repair the thermostat
Split AC Repair
Common problems possible with a Split AC
- Weak electrical connection
- A failed motor due to overheating
- Compressor span problems (needs a replacement)
- Problematic reversing valve
- Low or high refrigerant charge levels
- A dirty filter
- A dirty indoor evaporator coil
- A dirty condenser coil

Steps to Repair a Split AC in 9 steps
The air conditioning of a split system may be prone to collecting dirt and clogging, limiting the airflow. The external portion may catch leaves and debris from outside, which may hinder the efficiency of the unit. You may also need to change the filters out regularly to keep the operational effectiveness in top condition.
In a repair job, removing dirt and waste from the condenser as well as the inner surfaces is imperative. Once the cleaning is done, we make sure to keep the unit at least two meters away from any type of vegetation. We follow these steps to conduct repairs as given below.
- Disconnect the AC’s power supply.
- With a screwdriver, we separate the capacitor grille.
- We take hold of the filter protecting the radiator bracket on the coils and remove it. We soak it in a solution of soap and chlorine.
- We clean it well to remove all dirt and mold.
- We clean the coils by vacuuming and brushing them.
- We insert the wire through the stock hole without damaging any components.
- We turn the split AV over to vacuum the evaporator coils.
- We put all the components back and reinstall the AC.
- We use a hard brush to unclog the bottom parts.
Commercial Air Conditioner Repair
Parts for Commercial AC Repairs
- Capacitors: The run capacitors are responsible to keep the electricity going while the start capacitors assist in starting the current.
- Contractors: These moderate the electric flow throughout the AC’s components.
- Blower Motor: It keeps the system cool and protects it from overheating.
- Air Filter: Air filters are responsible for keeping the output air well-filtered and need to be changed every three to six months depending on the use.
- Compressor: It compresses the refrigerant responsible for keeping humid parts cool. Replacing a damaged compressor can be expensive.
- Evaporator Coils: Evaporator coils are easily corroded because they absorb humidity from the room.
Repair Checks For Commercial AC
Check for signs of leaks
We check the condenser, ports, evaporator, or heat exchanger for any signs of leaks in oil or other material. Next, we also check the refrigerant charge for any leaks.
Wire Connections
We check the wire connectors by tugging on them gently. We also inspect the contractors, terminal boar and microprocessor so that they’re well-connected tightly.
Check all Coils
The evaporator coil wires can be susceptible to damage due to moisture build-up. We make sure to check these out for signs of corrosion.
Check the Airflow
We pay attention to the AC’s airflow, blower motor, and fan to check whether they operate well. Remove any dust, debris, or mold from the HVAC and change the filters regularly.
Check the Belts
The belts and pulleys need to be tight, not loose or cracked. We lubricate all the moving parts, and change a damaged or cracked belt immediately.
Check the Drain
We pay attention to the pan and drain so that they remain clean at all times. A time-release pad added to the drain that can be changed quarterly is a great way to keep it in top shape.

Common Repair Tricks For Commercial HVACs
- Leaking Air Duct Repair
One can repair holes or minor a tear in the AC’s air duct seam easily without needing great expertise. We detect any holes by feeling any drafts and escaping air. Using metallic foil tape, wrap it around the duct and then double it with a sealant or duct mastic to block the leakage.
- Replacing Air Filters
On your own, you can remove the two screws at the bottom of the AC and you’ll generally see four filters. Remove the filters to replace them the gray mesh needs to face the compressor so that airflow moves correctly. Once done, put the door back with the screws.
- Fan Belt Replacement
A broken or worn-out fan can be replaced. We turn off the mains and pull the AC belt. Next, WE put the new belt on the pulley, while grabbing the other end to hook it on the flywheel. Now, WE set it back by slowly spinning it. We Double test the belt tension for good measure!
In Summary
We always recommend calling experts to get the job done right. From quick responses to same-day services, our AC Works AZ team of experts will have your air conditioner working in top condition without leaving you to suffer from the Arizona heat. If you’re in Phoenix, Glendale, or anywhere in the west Valley, find us by looking up “AC repair service near me” or visiting our website.
